Use case description
Problem statement
As a data scientist, I need to perform data analytics operations on a large amount of data.
Use case goals
- Load data from MinIO
- Read the data
- Perform data warehousing operations/queries on the data
- Show results locally
Tools & Capabilities
To meet the use case goals, the following tools from the portal will be leveraged:
| Tool | Description | Key capability |
|---|---|---|
| Jupyter notebook + Spark | The Jupyter Notebook is a web application for creating and sharing documents that contain code, visualizations, and text. It can be used for data science, statistical modeling, machine learning, and much more. Used for spark. | - Trigger Spark execution - Perform advanced analytics |
| MinIO | MinIO offers high-performance, S3 compatible object storage. Native to Kubernetes, MinIO is the only object storage suite available on every public cloud, every Kubernetes distribution, the private cloud and the edge. MinIO is software-defined and is 100% open source under GNU AGPL v3. | - load and store the data |
Dataset
Use case guide
This document is meant to guide the user through Scenario 4 - Big data analytics. As disussed in the use case description, the goal is to provide a tool that performs data analytics on a large amount of data. The guide will be a step by step guide tutorial such objective. More in detail, each sub-section covers a step of the approach, namely:
- Step 1: Initialize the resources.
- Step 2: Load the data on MinIO.
- Step 3: Configure MinIO.
- Step 4: Get Spark information.
- Step 5: Read the data on JupyterLab and trigger Spark execution.
Step 1: Initialize the resources
As first step, the user should initialise the required resources. More in particular, three instances should be launched:
- MinIO
- Jupyter for Spark
- Spark
Initialize the MinIO instance
- Go on the Service Catalog section of the Portal.
- Click on the button Launch on the MinIO badge.
- Assign a name to the instance and select a group from the ones available in the list.
- Select the Default configuration.
- Set your MinIO Admin Username and MinIO User Username. Copy the auto-generated password. This will be needed to access the instance in the later stage. (NB: Instance credentials are automatically saved and accessible on the My Data section of the portal).
- In the User Policies field, leave consoleAdmin only and cancel out the rest.
- In the Storage Resource field, assign 500Gi as value. This will allocate the MinIO instance sufficient storage space to store the use case data.
- Launch the instance by clicking on the launch button.
Initialize the Jupyter for Spark instance
- Go on the Service Catalog section of the Portal.
- Click on the button Launch on the Jupyter for Spark badge.
- Assign a name to the instance and select a group from the ones available in the list.
- Select the Default configuration.
- Copy the auto-generated password. This will be needed to access the instance in the later stage. (NB: Instance credentials are automatically saved and accessible on the My Data section of the portal).
- Select the NFS PVC name corresponding to the DSL group selected at point 3.
- Launch the instance by clicking on the launch button.
Initialize the Spark instance
- Go on the Service Catalog section of the Portal.
- Click on the button Launch on the Spark badge.
- Assign a name to the instance and select a group from the ones available in the list.
- Select the Default configuration.
- Set your Spark Username.
- Copy the auto-generated password. This will be needed to access the instance in the later stage. (NB: Instance credentials are automatically saved and accessible on the My Data section of the portal).
- The capacity allocated to the Spark instance needs to be sufficient to cope with the high workload request. Please make sure that an adequate capacity is assigned in the following configuration fields:
Master CPU Resource Request
Master Memory Resource Request
Master CPU Resource Limits
Master Memory Resource Limits
Worker Replicas
Worker CPU Resource Request
Worker Memory Resource Request
Worker CPU Resource Limits
Worker Memory Resource Limits
As an example, the following configuration can be suitable for the proposed use case:

8. Launch the instance by clicking on the launch button.
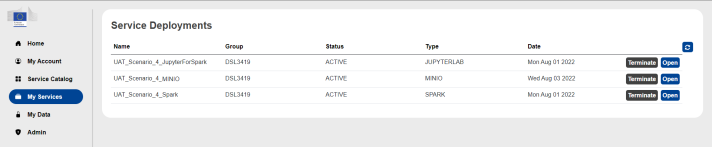
After having launch the instances, go on the My Services section of the portal to verify that all the deployed services are up and running (all three instances should be in status ACTIVE).
Step 2: Load the data on MinIO
- Download the dataset from here. Make sure to extract all the files.
- Go on the My Services section of the Portal and Open the MinIO instance.
- Login into your MinIO instance with the access credentials defined in the configuration.
- In the MinIO console, go into the Buckets section and click on Create Bucket +.

- Assign a Bucket Name (i.e. data) and click ok Create Bucket.
- After the bucket has been created, access it from the bucket list. Then, click on the Upload button and Upload File.

- Select the dataset downloaded and uncompressed at point 1.
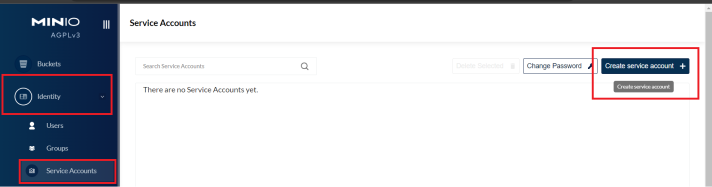
Step 3: Configure MinIO
In the MinIO console, click on Identity > Service Accounts > Create service account:
Then, click on Create and after on Download for import:
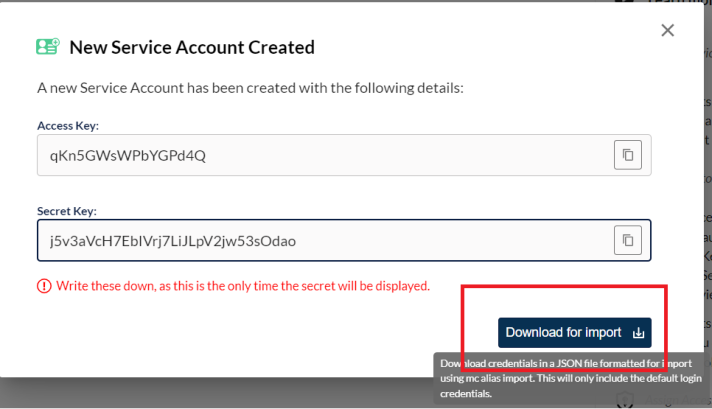
This will trigger the download of a JSON files, which can be read through a notepad. This file contains the following information:
- url: This is the private endpoint of the MinIO instance.
- accessKey
- secretKey
Step 4: Get Spark information
- Go on the My Services section of the Portal and Open the Spark instance.
- Login into your Spark instance with the access credentials defined in the configuration.
- When accessing the Spark instance, copy paste the URL showed on the UI:

This information will be needed in the next step.
Step 5: Read the data on JupyterLab and trigger Spark execution
- Go on the My Services section of the Portal and Open the Jupyter for Spark instance.
- Login into your Jupyter for Spark instance with the access credentials defined in the configuration.
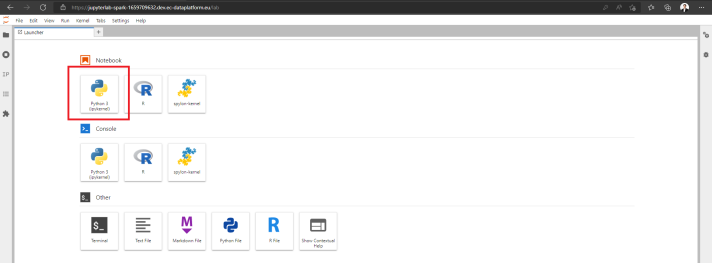
- In the Jupyter navbar, click on File and then on New Launcher.
- Click on Python 3 (ipykernel) in the Notebook section to create a new Jupyter for Spark notebook.
- In the newly created notebook, execute the command "%env" and copy the value of Jupyer hostname (HOSTNAME):
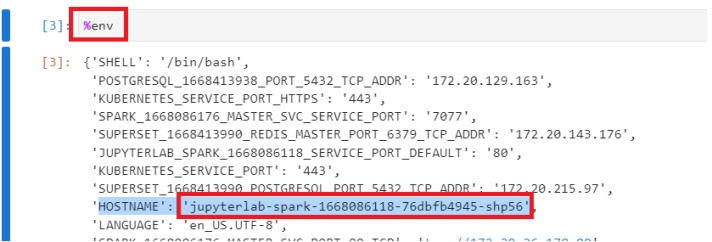
This information will be needed to compile the Notebook.
- Create the notebook by using this notebook as reference. Make sure to configure what is needed accordingly to the comments present in the notebook.
- This script will run the following operations on the data:
- Extract the data schema from all the parsed documents of the dataset;
- Run queries on the data:
- How many papers for each source?
- Which author has written the most papers?
- Which are the abstracts for the reported papers?
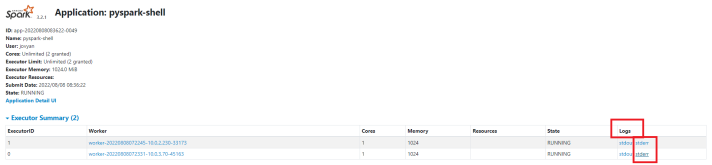
- Go on the My Services section of the Portal and Open the Spark instance.
- Login into your Spark instance with the access credentials defined in the configuration.
- Click on the currently Running Application:
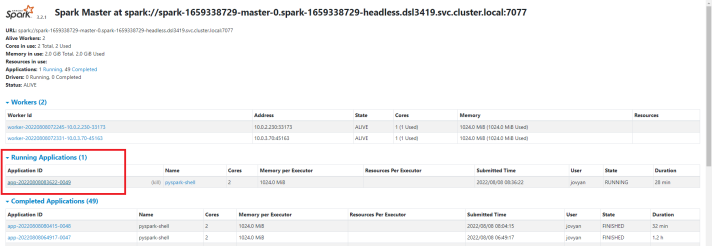
In the Logs column, click on stderr to visualize logs produced by each of the executors.