Description using KNIME (v4.5.3)
Problem statement
As a data scientist, I need to extract insights from data stored on a relational database in a low code/no code manner such that I can create reports quickly and with a low amount of effort.
Use case goals
- Load the data
- Perform ETL operations on the data
- Provide a low code/no code solution to create data visualizations
Tools & Capabilities
To meet the use case goals, the following tools from the portal will be leveraged:
| Tool | Description | Key capability |
|---|---|---|
| PostgreSQL | PostgreSQL is a powerful, open source object-relational database system with over 30 years of active development that has earned it a strong reputation for reliability, feature robustness, and performance. | - Load data - Data query |
| Knime | KNIME Analytics Platform is the open source software for creating data science. Intuitive, open, and continuously integrating new developments, KNIME makes understanding data and designing data science workflows and reusable components accessible to everyone. | - low code/no code ETL operations on the data - Visualization of the results |
| PgAdmin |
PgAdmin is the most popular and feature rich Open Source administration and development platform for PostgreSQL, the most advanced Open Source database in the world. |
- Data load |
This document is meant to guide the user through Scenario 3 - Low code data analytics (KNIME v4.5.3). As disussed in the use case description, the goal is to provide a tool that performs data analytics in a low code fashion. The guide will be a step by step tutorial towards such objective. More in detail, each subsection covers a step of the approach, namely:
- Step 1: Initialize the resources.
- Step 2: Connect PgAdmin to PostgreSQL
- Step 3: Load the data
- Step 4: Perform low code data analytics.
Step 1: Initialize the resources
As first step, the user should inizialize the required resources. More in particular, two instances should be launched:
- PostgreSQL instance
- Knime instance
- PgAdmin instance
Initialize the PostgreSQL instance
- Go on the Service Catalog section of the Portal.
- Click on the button Launch on the PostgreSQL badge.
- Assign a name to the instance and select a group from the ones available in the list.
- Select the micro configuration.
- Copy the auto-generated password. This will be needed to access the instance in the later stage. (NB: Instance credentials are automatically saved and acessible on the My Data section of the portal).
- Once the instance is deployed, it will be possible to copy its host address by clicking on the related button Copy in the My Services section of the portal.
Initialize the PgAdmin instance
- Go on the Service Catalog section of the Portal.
- Click on the button Launch on the PgAdmin4 badge.
- Assign a name to the instance and select a group from the ones available in the list.
- Select the default configuration.
- Set your PgAdmin email and copy the auto-generated password. This will be needed to access the instance in the later stage. (NB: Instance credentials are automatically saved and accessible on the My Data section of the portal)..
- Launch the instance by clicking on the launch button.
Initialize the Knime instance
- Go on the Service Catalog section of the Portal.
- Click on the button Launch on the Knime badge.
- Assign a name to the instance and select a group from the ones available in the list.
- Select the default configuration.
- Copy the auto-generated password. This will be needed to access the instance in the later stage. (NB: Instance credentials are automatically saved and acessible on the My Data section of the portal).
- Select the NFS PVC name corresponding to the DSL group selected at point 3.
- Launch the instance by clicking on the launch button.
After having launch the instances, go on the My Services section of the portal to verify that all the deployed services are up and running (all three instances should be in status ACTIVE).

Step 2: Configure pgAdmin and connect the PostgreSQL instance
- From the My Services section of the portal, click on the Copy button of the PostgreSQL instance to copy the host address of the instance in the clipboard.
-
The PostgreSQL host address is in the format:
<postgreSQLHost>:5432 -
Go on the My Services section of the portal and open the pgAdmin instance.
- Login into your pgAdmin account whith the credentials defined in the configuration.
- In the main page, click on the Browser tab: this will allow you to browse on all available resources on your pgAdmin account.
- On the Browser tab, right click on the Servers item > Register > Servers... . This will open up the configuration modal for registering a new server on our pgAdmin account: the PostgreSQL database will be added.
-
The configuration modal contains five fields that need to be compiled:
- Hostname/address: this is the hostname/address of the PostgreSQL instance. Input here the <postgresSQLHost> (see Step 2.2)
- Port: 5432
- Maintenance Database: postgres
- Username: postgres
- Password: input the PostgreSQL password defined in the configuration.
Step 3: Load the data
In order to load the data into the PostgreSQL database, we need to perform some operations on pgAdmin. Please note that pgAdmin is the management interface for PostgreSQL, so we need to use this service to interact with our DB on PostgreSQL. Finally, through pgAdmin we will:
- create the data table
- define the data schema for the table
- import the data from the source file
Create the data table
- In the Browser section, go to the Schemas and expand the public schema (postgres>Databases>Schemas).
- In the public schema, right-click on Table>Create>Table.. . This will open up the configuration modal for creating a new table on our public schema: in specific, the data table will be created.
- In the configuration modal, assign a name to the table (i.e. emhires_country) and click on save.
Define the schema for the data table
Please note that to import data from a csv file it is preliminarly needed to manually define the related data schema (namely, to add the columns of the table). This is achieved by following the steps:
- Right-click on the newly created table and click on Query Tool. This will open an SQL query tool (Query Editor) that will allow to perform queries on the database. Hence, the SQL query tool will be used to alter the current data schema and to add the columns present in our data source.
- Paste the following SQL query in the Query Editor:
NB: Make sure to substite name_of_your_table with the table name defined in the previous step.
- Execute the SQL query by clicking on the Play button (or by clicking F5)
- Verify that the columns has been created by checking the table properties (right click on the table name > Properties > Columns).
Import the data from the source file
- Download the data source csv file from here
- In the navbar, go on File > Preferences > Storage > Options and set the Maximym file upload size (MB) to 10000. Click on Save.
- Right-click on the newly created table and click ok Import/Export Data.... This will open an Import/Export Data tool that will allow us to import the data from the source file.
- Select the Import option.
- In the File Info section, click on the folder icon. This will open the Select file modal.
- In the navbar of the Select file modal, click on the Upload file icon.
- Drop the EMHIRESPV_TSh_CF_Country_19862015.csv file and wait for its uploading to be concluded.
- The uploaded file should be now visible in the list of available files. Click on it and press Select.
- In the File Info section, select csv as Format.
- In the Miscellaneous section tick the Header option. This will allow PgAdmin to take into account that the first row of the file contains the table headers.
- In the Miscellaneous section, select the comma (,) as Delimiter.
- Click on Ok and wait for the import process to be done.
Step 4: Perform low code data analytics
Launch Knime and install the JFree extension
- Go on the My Services section of the portal and launch the deployed Knime instance.
- Access the instance by inputing the password defined in the configuration phase. This will let you access the noVNC instance underlying the Knime service.
- When the noVNC environment is loaded, double click the Knime Icon to execute Knime. Then, click on Execute on the dialog box that pops-up.
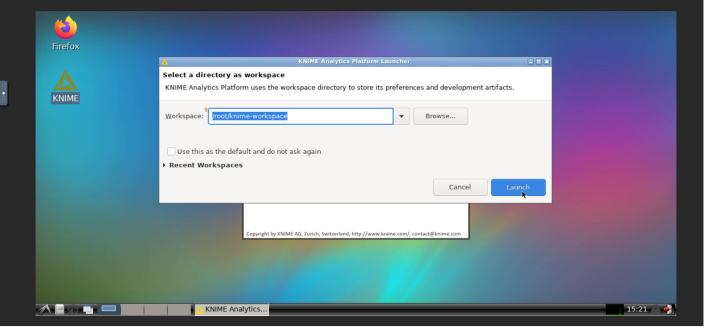
- Select /root/knime-workspace as workspace and click on launch.
- In the KNIME navbar, click on File > Install KNIME Extensions...
- Search for the KNIME JFreeChart extension. Select it and click on Next.
- Wait for the extensions' installation process to be done.
Create Knime workflows
- In the Knime Explorer tab (top-left of the screen), select and right-click on the efs-storage. Then, click on New KNIME Workflow...
- Assign a name to the workflow (eg: Average capacity factor per country) and make sure that the destination of the new workflow is LOCAL:/efs-storage: saving the workflows on the efs volume will allow to access them even if you terminate the instance and then you launch a new one at a later time (if you assign the same efs volume in the configuration phase)

Then, click on finish to ultimate the creation of the new Knime workflow.
Build the Knime Workflow
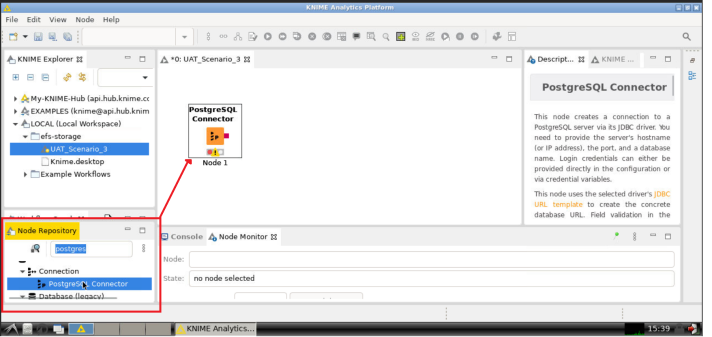
1. PostgreSQL Connector
- In the Knime Explorer section, open the Knime workflow just created.
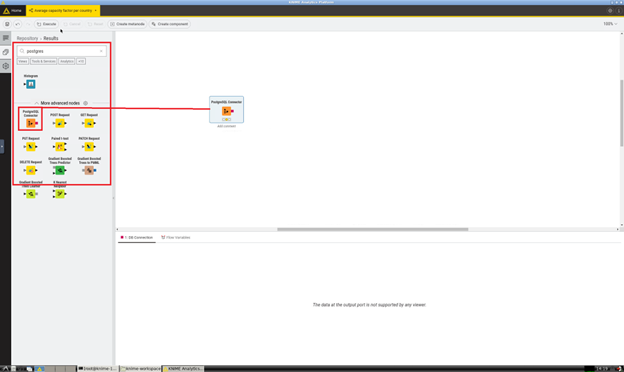
- In the Node Repository section, look for "postgreSQL" and then drag-and-drop the PostgreSQL Connector element in the workflow:
- Right click on the PostgreSQL Connector node and click on Configure..
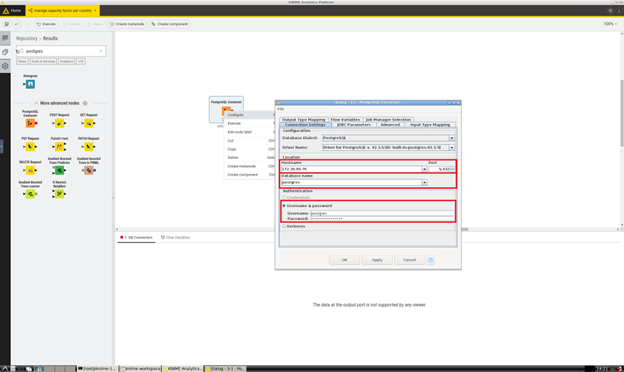
- In the configuration dialog box, fill-in the needed information in the Connection Settings tab:
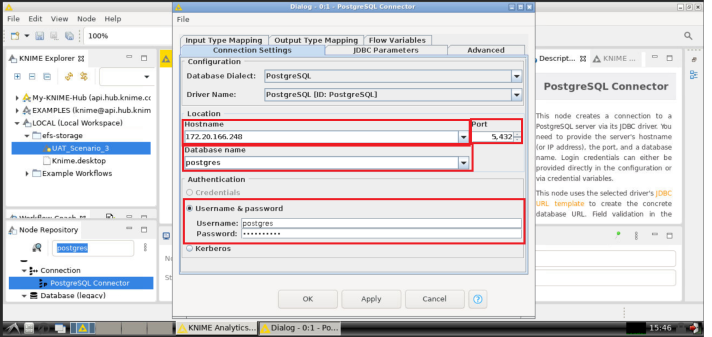
- *Hostname/address*: this is the hostname/address of the PostgreSQL instance. Input here the `<postgresSQLHost>` (see Step 2.2)
- *Port*: 5432 - *Username*: postgres
- *Password*: input the PostgreSQL password defined in the configuration.
- *Authentication*: select the option *Username & password* and fill-in the Username and Password (which correspond to the *Admin username* and *Admin Password* of your PostgreSQL instance).
- Click on Apply and then Ok. Thus, right-click on the PostgreSQL Connector node and click on Execute. If the execution of the node is succesfull, the stoplight indicator of the node will turn to green.
2. DB Table Selector
- Just as it is done for the PostgreSQL Connector node, in the Node Repository section look for "DB Table Selector" and then drag-and-drop the DB Table Selector element in the workflow.
- Connect the two nodes: select them (by pressing Ctrl and left-click on both), right click and select Connect selected nodes:
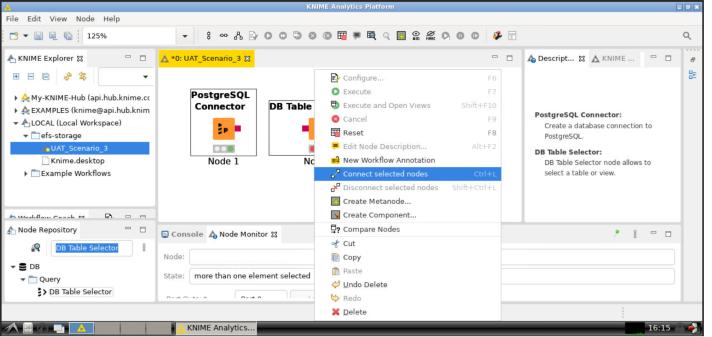
Please note that you could alternatively connect two nodes by selecting them and pressing Ctrl + L or by simply drawing a line between the two nodes' ends.
- When the PostgreSQL Connector node and the DB Table Selector nodes are connected, right click on the latter and click on Configure...
- Click on the Select a table button and on the dialog windows that pops-up select the PostgreSQL table that contains the data from this dataset (EMHIRESPV grouped by country). Execute the node.
3. DB Table Reader
- In the Node Repository section look for "DB Reader" and then drag-and-drop the DB Reader element in the workflow. Then, connect it with the DB Table Selector node.
- Right click on the newly addedd DB Reader node and Execute the node.
4. GroupBy
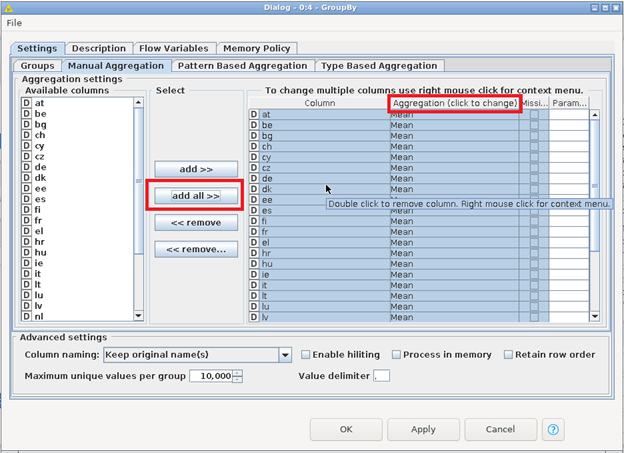
- In the Node Repository section look for "GroupBy" and then drag-and-drop the GroupBy element in the workflow. Then, connect it with the DB Reader node.
- Right click on the newly addedd GroupBy node and click on Configure....
- In the Configuration Dialog, click on add all>> to process all columns. Make sure that the Aggregation field is set on Mean. This transformation will calculate the average capacity factor value per each country.
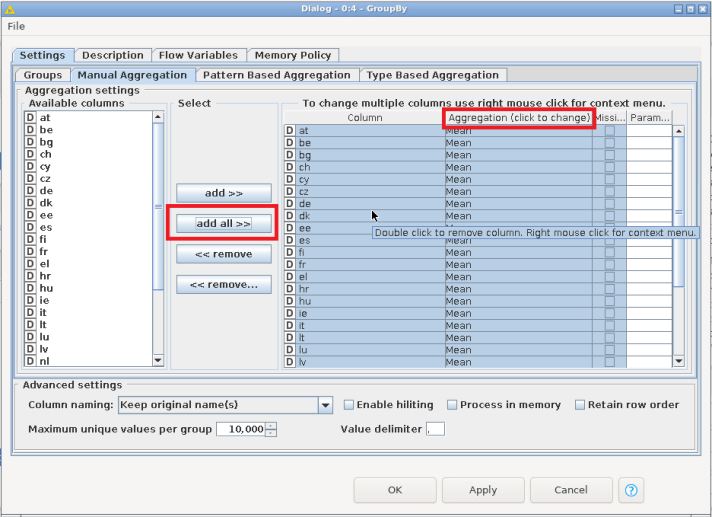
- Click on Apply and then on Ok. When the configuration is done, execute the node.
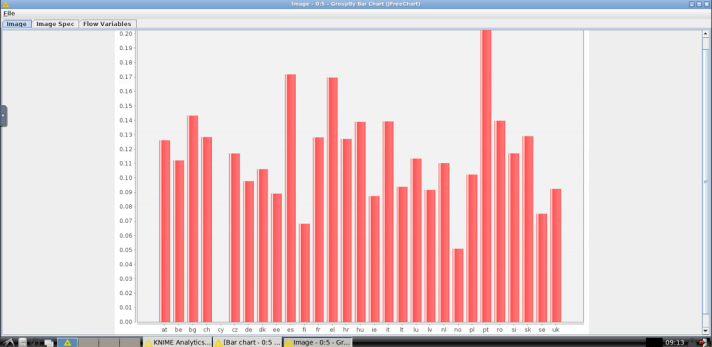
5. GroupBy Bar Chart (JFreeChart)
- In the Node Repository section look for GroupBy Bar Chart (JFreeChart) and then drag-and-drop it in the workflow. Then, connect it with the GroupBy node.
- Right click on the newly addedd GroupBy Bar Chart (JFreeChart) node and Execute the node.
- Right click on the GroupBy Bar Chart (JFreeChart) node and click on Image. This will visualize the results on the screen:
Here the final workflow as described in the steps:

Description using KNIME (v5.1)
This document is meant to guide the user through Scenario 3 - Low code data analytics. As disussed in the use case description, the goal is to provide a tool that performs data analytics in a low code fashion. The guide will be a step by step tutorial towards such objective. More in detail, each subsection covers a step of the approach, namely:
- Step 1: Initialize the resources.
- Step 2: Connect PgAdmin to PostgreSQL
- Step 3: Load the data
- Step 4: Perform low code data analytics.
Step 1: Initialize the resources
As first step, the user should inizialize the required resources. More in particular, two instances should be launched:
- PostgreSQL instance
- Knime instance
- PgAdmin instance
Initialize the PostgreSQL instance
- Go on the Service Catalog section of the Portal.
- Click on the button Launch on the PostgreSQL badge.
- Assign a name to the instance and select a group from the ones available in the list.
- Select the micro configuration.
- Copy the auto-generated password. This will be needed to access the instance in the later stage. (NB: Instance credentials are automatically saved and acessible on the My Data section of the portal).
- Once the instance is deployed, it will be possible to copy its host address by clicking on the related button Copy in the My Services section of the portal.
Initialize the PgAdmin instance
- Go on the Service Catalog section of the Portal.
- Click on the button Launch on the PgAdmin4 badge.
- Assign a name to the instance and select a group from the ones available in the list.
- Select the default configuration.
- Set your PgAdmin email and copy the auto-generated password. This will be needed to access the instance in the later stage. (NB: Instance credentials are automatically saved and accessible on the My Data section of the portal)..
- Launch the instance by clicking on the launch button.
Initialize the Knime instance
- Go on the Service Catalog section of the Portal.
- Click on the button Launch on the Knime badge.
- Assign a name to the instance and select a group from the ones available in the list.
- Select the default configuration.
- Copy the auto-generated password. This will be needed to access the instance in the later stage. (NB: Instance credentials are automatically saved and acessible on the My Data section of the portal).
- Select the NFS PVC name corresponding to the DSL group selected at point 3.
- Launch the instance by clicking on the launch button.
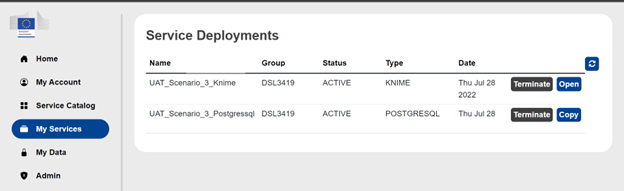
After having launch the instances, go on the My Services section of the portal to verify that all the deployed services are up and running (all three instances should be in status ACTIVE).
Step 2: Configure pgAdmin and connect the PostgreSQL instance
- From the My Services section of the portal, click on the Copy button of the PostgreSQL instance to copy the host address of the instance in the clipboard.
- The PostgreSQL host address is in the format:
- <postgreSQLHost>:5432
- Go on the My Services section of the portal and open the pgAdmin instance.
- Login into your pgAdmin account whith the credentials defined in the configuration.
- In the main page, click on the Browser tab: this will allow you to browse on all available resources on your pgAdmin account.
- On the Browser tab, right click on the Servers item > Register > Servers... . This will open up the configuration modal for registering a new server on our pgAdmin account: the PostgreSQL database will be added.
- The configuration modal contains five fields that need to be compiled:
- Hostname/address: this is the hostname/address of the PostgreSQL instance. Input here the <postgresSQLHost> (see Step 2.2)
- Port: 5432
- Maintenance Database: postgres
- Username: postgres
- Password: input the PostgreSQL password defined in the configuration.
Step 3: Load the data
In order to load the data into the PostgreSQL database, we need to perform some operations on pgAdmin. Please note that pgAdmin is the management interface for PostgreSQL, so we need to use this service to interact with our DB on PostgreSQL. Finally, through pgAdmin we will:
- create the data table
- define the data schema for the table
- import the data from the source file
Create the data table
- In the Browser section, go to the Schemas and expand the public schema (postgres>Databases>Schemas).
- In the public schema, right-click on Table>Create>Table.. . This will open up the configuration modal for creating a new table on our public schema: in specific, the data table will be created.
- In the configuration modal, assign a name to the table (i.e. emhires_country) and click on save.
Define the schema for the data table
Please note that to import data from a csv file it is preliminarly needed to manually define the related data schema (namely, to add the columns of the table). This is achieved by following the steps:
- Right-click on the newly created table and click on Query Tool. This will open an SQL query tool (Query Editor) that will allow to perform queries on the database. Hence, the SQL query tool will be used to alter the current data schema and to add the columns present in our data source.
- Paste the following SQL query in the Query Editor:
ALTER TABLE public."name_of_your_table"
ADD COLUMN AT float,
ADD COLUMN BE float,
ADD COLUMN BG float,
ADD COLUMN CH float,
ADD COLUMN CY float,
ADD COLUMN CZ float,
ADD COLUMN DE float,
ADD COLUMN DK float,
ADD COLUMN EE float,
ADD COLUMN ES float,
ADD COLUMN FI float,
ADD COLUMN FR float,
ADD COLUMN EL float,
ADD COLUMN HR float,
ADD COLUMN HU float,
ADD COLUMN IE float,
ADD COLUMN IT float,
ADD COLUMN LT float,
ADD COLUMN LU float,
ADD COLUMN LV float,
ADD COLUMN NL float,
ADD COLUMN NO float,
ADD COLUMN PL float,
ADD COLUMN PT float,
ADD COLUMN RO float,
ADD COLUMN SI float,
ADD COLUMN SK float,
ADD COLUMN SE float,
ADD COLUMN UK float;
NB: Make sure to substite name_of_your_table with the table name defined in the previous step.
- Execute the SQL query by clicking on the Play button (or by clicking F5)
- Verify that the columns has been created by checking the table properties (right click on the table name > Properties > Columns).
Import the data from the source file
- Download the data source csv file from here - (direct download URL)
- In the navbar, go on File > Preferences > Storage > Options and set the Maximym file upload size (MB) to 10000. Click on Save.
- Right-click on the newly created table and click ok Import/Export Data.... This will open an Import/Export Data tool that will allow us to import the data from the source file.
- Select the Import option.
- In the File Info section, click on the folder icon. This will open the Select file modal.
- In the navbar of the Select file modal, click on the Upload file icon.
- Drop the EMHIRESPV_TSh_CF_Country_19862015.csv file and wait for its uploading to be concluded.
- The uploaded file should be now visible in the list of available files. Click on it and press Select.
- In the File Info section, select csv as Format.
- In the Miscellaneous section tick the Header option. This will allow PgAdmin to take into account that the first row of the file contains the table headers.
- In the Miscellaneous section, select the comma (,) as Delimiter.
- Click on Ok and wait for the import process to be done.
Step 4: Perform low code data analytics
Launch Knime and install the JFree extension
- Go on the My Services section of the portal and launch the deployed Knime instance.
- Access the instance by inputing the password defined in the configuration phase. This will let you access the noVNC instance underlying the Knime service.
- When the noVNC environment is loaded, double click the Knime Icon to execute Knime. Then, click on Execute on the dialog box that pops-up.
Note: If you have been using the older version of Knime from the service catalog, it is recommended to switch to a different workspace folder e.g /root/knime-workspace/efs-storage/5.1.0 to avoid mixing newer (5.x) and older (4.x) Knime projects/workflows as they might not be compatible.
- Select /root/knime-workspace/efs-storage/<your-folder> as workspace and click on launch.

Note: The JFreeChart extensions has been marked as legacy, see the Knime 5.1 Analytics Platform changelog. Instead, we can use the regular Bar chart node with some modifications. The steps below can be skipped.
- In the KNIME navbar, click on File > Install KNIME Extensions...
- Search for the KNIME JFreeChart extension. Select it and click on Next.
- Wait for the extensions' installation process to be done.
Create Knime workflows
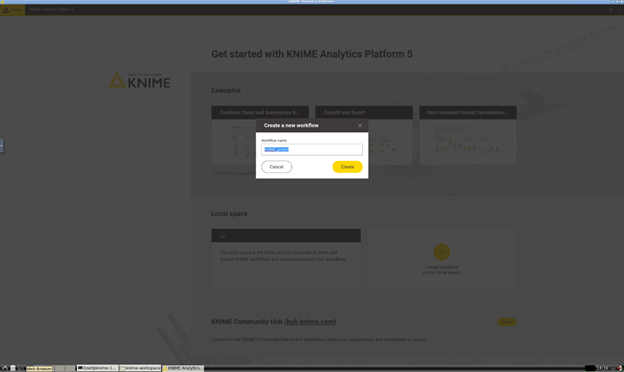
- In the Knime Homescreen Local space section (middle of the screen), select Create workflow in your local space.
- Assign a name to the workflow (eg: Average capacity factor per country) and press Create. Saving the workflows on the efs volume will allow to access them even if you terminate the instance and then you launch a new one at a later time (if you assign the same efs volume in the configuration phase)
Build the Knime Workflow
1. PostgreSQL Connector
- In the Knime Explorer section, open the Knime workflow just created.
- In the Node Repository section, look for "postgreSQL" and then drag-and-drop the PostgreSQL Connector element in the workflow:
- Right click on the PostgreSQL Connector node and click on Configure..
- In the configuration dialog box, fill-in the needed information in the Connection Settings tab:
- *Hostname/address*: this is the hostname/address of the PostgreSQL instance. Input here the `<postgresSQLHost>` (see Step 2.2)
- *Port*: 5432
- *Username*: postgres
- *Password*: input the PostgreSQL password defined in the configuration.
- *Authentication*: select the option *Username & password* and fill-in the Username and Password
(which correspond to the *Admin username* and *Admin Password* of your PostgreSQL instance).
- Click on Apply and then Ok. Thus, right-click on the PostgreSQL Connector node and click on Execute. If the execution of the node is succesfull, the stoplight indicator of the node will turn to green.
2. DB Table Selector
- Just as it is done for the PostgreSQL Connector node, in the Node Repository section look for "DB Table Selector" and then drag-and-drop the DB Table Selector element in the workflow.
- Connect the two nodes: select and drag the output box of the PostgreSQL Conncetor node and drop on the input box of the DB Table Selector node.

- When the PostgreSQL Connector node and the DB Table Selector nodes are connected, right click on the latter and click on Configure...
- Click on the Select a table button and on the dialog windows that pops-up select the PostgreSQL table that contains the data from this dataset (EMHIRESPV grouped by country). Execute the node.
3. DB Table Reader
- In the Node Repository section look for "DB Reader" and then drag-and-drop the DB Reader element in the workflow. Then, connect it with the DB Table Selector node.
- Right click on the newly addedd DB Reader node and Execute the node.
4. GroupBy
- In the Node Repository section look for "GroupBy" and then drag-and-drop the GroupBy element in the workflow. Then, connect it with the DB Reader node.
- Right click on the newly addedd GroupBy node and click on Configure....
- In the Configuration Dialog, click on add all>> to process all columns. Make sure that the Aggregation field is set on Mean. This transformation will calculate the average capacity factor value per each country.
- Click on Apply and then on Ok. When the configuration is done, execute the node.
5. Table Transposer
- In the Node Repository section look for "Table Transposer" and then drag-and-drop the Table Transposer element in the workflow. Then, connect it with the GroupBy node.
- Right click on the newly addedd Table Transposer node and Execute the node.
6. RowID
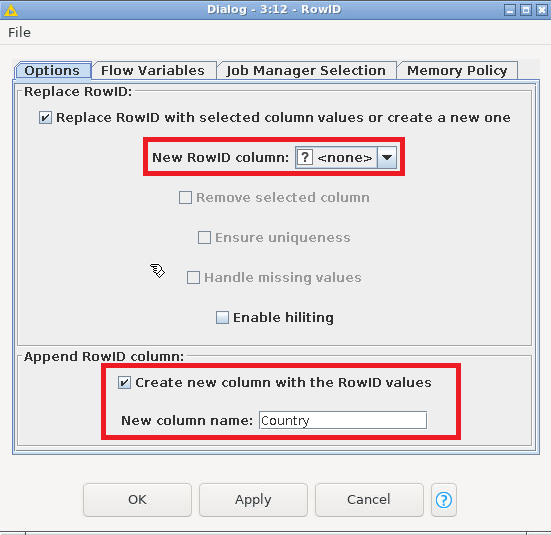
- In the Node Repository section look for "RowID" and then drag-and-drop the RowID element in the workflow. Then, connect it with the Table Transposer node.
- Right click on the newly addedd RowID node and click on Configure....
- In the Configuration Dialog under the Replace RowID section, set New RowID column to <none>. Under the Append RowID column section, check the Create new column with the RowID values checkbox and set the New column name to Country
- Right click on the newly addedd RowID node and Execute the node.
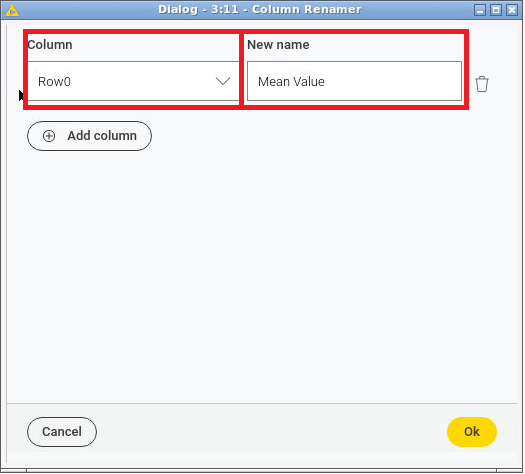
7. Column Renamer
- In the Node Repository section look for "Column Renamer" and then drag-and-drop the Column Renamer element in the workflow. Then, connect it with the RowID node.
- Right click on the newly addedd Column Renamer node and click on Configure....
- In the Configuration Dialog, select for Column Row0 and for New name Mean Value to provide a clearer column name. Press ok.
- Right click on the newly addedd Column Renamer node and Execute the node.
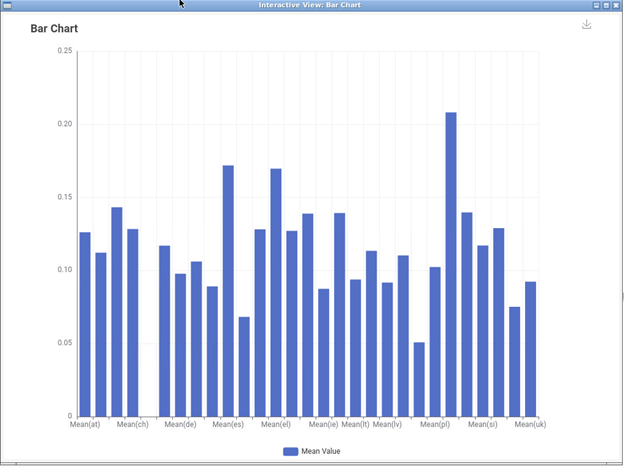
8. Bar Chart
- In the Node Repository section look for Bar Chart and then drag-and-drop it in the workflow. Then, connect it with the Column Renamer node.
- Right click on the newly addedd Bar Chart node and Execute the node.
- Right click on the Bar Chart node and click on Open View. This will visualize the results on the screen:
Here the final workflow as described in the steps:
